Directed 508D Manual2 January 2016 | Admin
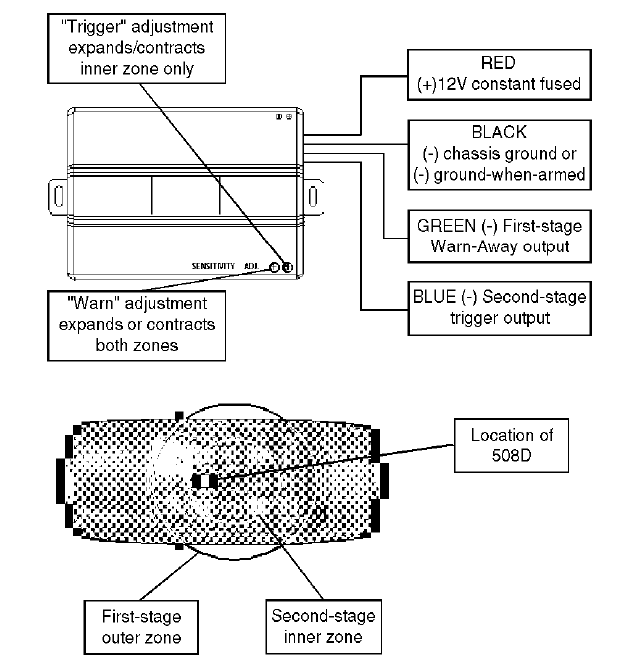
If you have a Directed 508D fitted to your vehicle the chances are you may want to adjust the sensor at some point. When looking at the sensor there are 3 pots in total. You need a small flat blade screw driver but you will only use the 2 adjustment pots to the right of the Directed 508D sensor. These 2 adjustment pots change the way the invisible bubble gets bigger and smaller when turning the adjustment screw. The first thing you need to note only turn the screw in very small amounts. Turning the screw quickly will throw out all adjustment settings. When you are setting up the sensor you will want to turn the interior ( inner zone ) to the bottom left nothing. Once that has been done adjust the warn away zone by turning the left adjustment screw up by small amounts at a time. To test the warn away get outside the vehicle make sure there is no lighting near your vehicle and make sure both sides are clear. arm your alarm and wait at least 30 seconds for the beam pattern to fully settle. Once your happy with your warn away adjustment, adjust the interior zone ( inner zone ) using the adjustment pot to the right of the 508D. I would suggest getting out the vehicle and re checking both zones with the drivers and passanger windows down. If your happy remount your sensor with double sided tape. With the 508D there is no need to fit the sensor on bare metal due to it having its own ground plane inside the unit. Having problems with window tint and your 508D? |
Call: 07525 068 291Monday - Friday : 9am - 5pm |